Hardware Configuration
You
can configure the operation mode of serial ports, enable/disable the Tx ,Rx termination resistors, enable/disable
Tx, Rx BIASing resistors either via serial console port or by the
provided GUI (Graphic User Interface) configuration utility program (UsbComCfg).
Configure Hardware via GUI Utility Program
You must finish the driver and hardware installation first,
before proceeding to hardware configuration. The GUI hardware configuration
utility program needs to work with the first serial port of the VSCOM USB PRO
series Industrial I/O Adapters.
Please proceed with the following steps
to run the GUI hardware configuration program:
1. Press the CONFIG button for two seconds until the blue LED will light.
2. Insert the “USB COM
Series Driver and Utility” CD into your CD-ROM.
3. The “USB COM Series Driver and Utility CD”
dialog box appears.
4. Under “USB
PRO Series Hardward Configuration Utility”, double click “UsbComCfg” to run the GUI hardware configuration utility program.
5. When following message appears, select the
product model detected under “Devices:”, and then choose the port number under
“Ports” to start the serial port hardware
configuration.
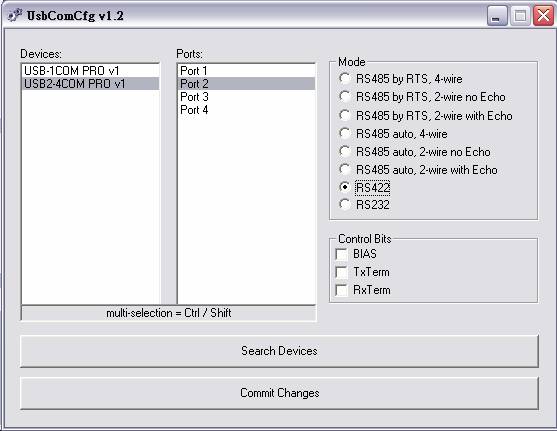
6. Under “Mode”, you can
select operation mode of serial port.
7. Under “Control Bits”,
you can enable or disable BIASing and termination resistors. This option is
only available when the serial port is set to RS-422 and RS-485 mode.
7.1 Click “BIAS” to enable Tx ,Rx BIASing
resistors.
If the BIASing resistors are already enabled, click “BIAS” again the
BIASing resistors will be disabled.
When Tx ,Rx BIASing resistors are enabled, the TxD+ (data+) and RxD+
will pull-up with 750 Ohm resistors, and the TxD-(data-) and RxD- will also
pull-down with 750 Ohm resistors.
7.2 Click “TxTerm” to enable the Tx termination
resistor.
If the termination resistor is already enabled, click “TxTerm” again
the Tx termination resistor will be disabled.
When Tx termination resistors are enabled, a 120 Ohm termination
resistor will be added between the TxD+ (data+) and TxD- (data-).
7.3 Click “RxTerm” to enable the Rx Termination
resistor.
If the termination resistor already enabled, click “RxTerm” again
the Rx termination resistor will be disabled.
When Rx termination resistors are enabled, a 120 Ohm Termination
resistor will be added between the RxD+ and RxD-.
8. Wen you finish the
hardware configuration setting, double click “Commit Change” to save all
configuration data into EEPROM. Press the CONFIG
button to exit the hardware configuration
setting. The blue LED will change to dark. You are in normal operation mode
now.
9. When a new VSCOM USB PRO Series
Industrial I/O Adapter is attach to system, please double click the “Search Devices” to re-start hardware
configuration setting for this device.
Configure Hardware via Serial Console port
You must finish the driver and hardware installation first,
before proceeding to hardware configuration. The serial console port and
hardware configuration utility program need to work with the first serial port
of the VSCOM USB PRO series Industrial I/O Adapters.
You
must find from the “Device Manager” of Windows the first serial port number of
your VSCOM USB PRO Industrial I/O Adapter. Open this serial port with any terminal program (Hyperterminal, or other terminal emulator program), select 38400 bps, 8 Bit, No Parity, 1 stop
bit, flow control : none for serial console port. (Note: the default flow
control setting of Hyperterminal is “hardware”, you need to change to “none”
for proper operation).
After opening terminal program for serial console port, you must press the CONFIG button
and hold for two seconds until the blue LED will light. Following is an example
of the message that will appear, if the product is an USB2-4COM PRO.
[4#1] USB2-4COM PRO v1: please press <ENTER> to
activate the menu
Hardware
Configuration Main Menu.
Press <Enter> to activate the
hardware configuration main menu.
The hardware configuration main menu
messages are:
0 - Exit
----------------------------------------------
1 - Show all
port configurations
2 - Change port
configurations
3 - Default port
configurations
4 - Save port
configurations
----------------------------------------------
5 - Show
configuration file
6 - Upload configuration
file
Press <0> to exit the hardware
configuration main menu and the blue LED will change to dark.
Press <5> to show the hardware
configuration file (decimal values)
Press <6> to upload the hardware
configuration file (decimal values)
Press <1> to show all port
hardware configurations, the message are following:
Port 1: RS232
Port 2: RS422 (BIAS, TxTerm, RxTerm)
Port 3: RS485 auto, 2-wire with Echo (none)
Port 4: RS485 by RTS, 2-wire no Echo (BIAS, TxTerm)
Port 1: RS232
Port 1 is working in RS-232 mode.
Port 2: RS422 (BIAS, TxTerm, RxTerm)
Port 2 is working in RS-422 mode.
BIASing resistor and Tx , Rx termination resistors are enabled.
Port 3: RS485 auto, 2-wire with Echo (none)
Port 3 is working in RS-485 half duplex
mode with automatic data receive and transmit control. BIASing resistors and
termination resistors are disabled.
Port 4: RS485 by RTS, 2-wire no Echo (BIAS, TxTerm)
Port 4 is working in RS-485 half duplex
mode. BIASing resistors and Tx termination resistors are enabled. The data
receive and transmit control is by RTS signal.
Press <3> to set all ports in
default configurations to RS-232 mode.
After press <3> to set all ports
to default configurations, you must press <4> to save default port
configurations data into EEPROM.
Press <4> to save all
configurations data into EEPROM. When the save operation is finished, the
screen will show:
OK - values were written to the eeprom
Press <2> to change port
configurations menu, the message are:
0 -
Back
---------------
1 - Port 1
2 - Port 2
.
.
---------------
x - All
Ports
If the adapter is single-port
version (USB-COM PRO), “x” is 2; dual-port version (USB-2COM PRO), “x” is 3;
quad-port version (USB2-4COM PRO), “x” is 5 and 8-port version
(USB2-8COM PRO), “x” is 9. For 16-port version (USB2-16COM PRO), x is 17.
Press <0> to return to hardware
configuration main menu.
Press <x> to set all the ports
with same hardware configuration.
Port Setting
Menu.
Press <
Hardware configuration and port setting
menu options include the following:
---------------------------------------------------
0 - Back
---------------------------------------------------
1 - RS485 by
RTS, 4-wire
2 - RS485 by
RTS, 2-wire no Echo
3 - RS485 by
RTS, 2-wire with Echo
4 - RS485 auto,
4-wire
5 - RS485 auto,
2-wire no Echo
6 - RS485 auto,
2-wire with Echo
7 - RS422
8 - RS232
----------------------------------------------------
9 - BIAS
10 - TxTerm
11 - RxTerm
Press <0> back to change port
configurations menu.
Press <1> ~ <8> to select
operation mode of serial port. the operation modes are :
Operation Mode
of
1 - RS485 by RTS, 4-wire--- RS-485 full duplex mode, data receive and transmit control by RTS signal.
2 - RS485
by RTS, 2-wire no Echo --- RS-485 half duplex mode, data
receive and transmit control by RTS, no transmit data echo.
3 - RS485 by RTS, 2-wire with Echo--- RS-485 half duplex mode, data receive and transmit control by RTS signal
with transmit
data echo.
4 - RS485 auto, 4-wire--- RS-485 full duplex mode with automatic data receive and transmit control.
5 - RS485 auto, 2-wire no Echo--- RS-485 half duplex mode with automatic data receive and transmit control, no transmit data echo.
6 - RS485
auto, 2-wire with Echo--- RS-485 half duplex mode with
automatic data
receive and transmit control, transmit data echo.
7 - RS422 --- RS-422 mode
8 - RS232 --- RS-232 mode
BIASing and
Termination Resistor.
Press <9> to enable Tx, Rx BIASing
resistors. If the BIASing resistors are already enabled, you can press
<9> to disable it.
When Tx ,Rx BIASing resistors are
enabled, the TxD+(data+) and RxD+ will pull-up with 750 Ohm resistors. The
TxD-(data-) and RxD- will also pull-down with 750 Ohm resistors.
Press <10> to enable the Tx
termination resistor. If the termination resistor is already enabled, you can
press <10> to disable it.
When Tx Termination resistor is enabled,
a 120 Ohm termination resistor will be added between the TxD+ (data+) and TxD-
(data-).
Press <11> to enable the Rx
termination resistor. If the termination resistor is already enabled, you can
press <11> to disable it.
When Tx termination resistors is
enabled, a 120 Ohm termination resistor will be added between the RxD+ and RxD-.
Completion of
After finishing the hardware
configuration setting of serial port, press <0> twice to return to the
hardware configuration main menu.
0 - Exit
----------------------------------------------
1 - Show all
port configurations
2 - Change port
configurations
3 - Default port
configurations
4 - Save port
configurations
----------------------------------------------
5 - Show
configuration file
6 - Upload configuration
file
Press <4> to save all
configurations data into EEPROM. When save operation is finished, press
<0> to exit the hardware configuration main menu. Now, the blue LED
changes to dark again. You exit the configuration mode and in the normal operation
mode now.
LED
Indicators
The VSCOM USB PRO
Series Industrial I/O Adapters are designed with monitor LEDs
of TxD & RxD indicating serial port data transmit and receive status, and with Operation Mode LEDs indicating serial port operation
mode of RS-232/422/485.
Operation Mode and Mode LED Color
|
Operation Mode |
Mode LED Color |
|
RS-232 |
Red |
|
RS-422 |
Green |
|
RS-485 auto,2-Wire with
echo |
|
|
RS-485 auto,2-Wire no
echo |
|
|
RS-485 auto ,4-Wire |
|
|
RS-485 by RTS,2-Wire
with echo |
|
|
RS-485 by RTS,2-Wire no
echo |
|
|
RS-485 by RTS,4-Wire |
|